What a busy week here in the Brass Lab. The work has been picking up as we finish up casing/piston repair and get into full swing with the French Horn.
To start the week off, I aligned an out-of-round piston on a cornet. This piston had some major issues, including a large bend, and some small dents all over the surface. To begin, I found where the fulcrum of the large dent was and, using the bottom of the casing as a pivot point, hit the piston with a mallet to bring down the dent. This was somewhat successful, but do to the other issues involved, not very. Next I used a sized sleeve as a swedging die to remove some of the out-of-round damage from the piston. This was very successful. Before reinstalling the piston, there were a few dents that hadn't been totally removed from the casing, so using a slotted casing mandrel I burnished them to smooth. The piston will never feel like new again, but it is definitely playable.
Moving on to the project French Horn, someone put a pretty gnarly flat spot into this tuning slide. I began by removing the little bit of excess solder from the inside of the tube so that I could reach the dent. Using a Ferree's driver, I pushed dent balls through the crook to expand it back to round. Unfortunately, this crook is ridiculously strong. In order to get more pressure, I switched to the Roth tool. After the dents were brought out, there was a very sharp ridge left on the inside rim. Using a Delrin mallet and a draw plate, I managed to smooth the ridge a little. There is still evidence that there was a dent on that crook, but it has come a long way.
On to bell dents. The French Horn has a large bell. As a result, the brass gets very thin towards the bell. This makes it very easy to dent, even on a thick horn like this one. So using a bell iron and a roller, I went around the entire bell flare looking for small dents that needed to be removed. Further up the bell into the stem there were two more severe dents that had to be removed. Both were sharp and both were deep. To remove them, I used a series of dent balls on a french horn mandrel to raise the dent to surface and tap on it. After repeating this process several times, the dents were as good as gone.
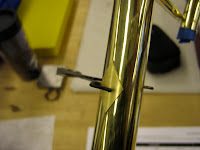
Continuing down the bell stem towards the ferrule, I encountered a smashed in finger hood. This is not an uncommon dent. To remove it, we must first remove the finger hook. While already set up at the soldering bench, I soldered a dent puller into the crease of the dent. With a hefty weight on its shaft, this puller can be used to put quite a bit of force on the dent, pulling it up enough to get a dent ball in. Once it was pulled up, I used a series of dent balls strung down a cable to knock the dent out. The dent is now mostly out and will be burnished next week.
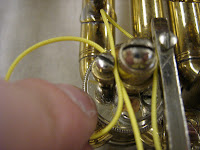
Towards the end of the week, we looked at restringing French Horn rotors. This process was actually more complicated than I expected. We began by removing all of the levers from the horn and aligning them. After reinstalling them, we string the rotor using the "Three Under" method. It is very difficult to explain, but it strings the horn in a way that allows you to adjust the height of the key with one screw, and doesn't leave any slop. The three levers were strung and leveled to each other perfectly.
Like on trumpets, the tubes on a horn get bent and knocked out of alignment. One issue that I was having was the mouthpipe receiver end was bent in at the brace. To fix this, I used a piccolo mandrel inside the mouthpipe and simply bent it back. Nothing fancy, but it's in line now.
Finally, I would like to note that our program was featured on a television program a couple of weeks ago. The camera crews came in before the Christmas Break and took some snazzy shots. The segment was very well done and quite informative. You can find it at http://www.kstp.com/article/12303/?vid=3168482&v=1 Enjoy.
To start the week off, I aligned an out-of-round piston on a cornet. This piston had some major issues, including a large bend, and some small dents all over the surface. To begin, I found where the fulcrum of the large dent was and, using the bottom of the casing as a pivot point, hit the piston with a mallet to bring down the dent. This was somewhat successful, but do to the other issues involved, not very. Next I used a sized sleeve as a swedging die to remove some of the out-of-round damage from the piston. This was very successful. Before reinstalling the piston, there were a few dents that hadn't been totally removed from the casing, so using a slotted casing mandrel I burnished them to smooth. The piston will never feel like new again, but it is definitely playable.
Moving on to the project French Horn, someone put a pretty gnarly flat spot into this tuning slide. I began by removing the little bit of excess solder from the inside of the tube so that I could reach the dent. Using a Ferree's driver, I pushed dent balls through the crook to expand it back to round. Unfortunately, this crook is ridiculously strong. In order to get more pressure, I switched to the Roth tool. After the dents were brought out, there was a very sharp ridge left on the inside rim. Using a Delrin mallet and a draw plate, I managed to smooth the ridge a little. There is still evidence that there was a dent on that crook, but it has come a long way.
On to bell dents. The French Horn has a large bell. As a result, the brass gets very thin towards the bell. This makes it very easy to dent, even on a thick horn like this one. So using a bell iron and a roller, I went around the entire bell flare looking for small dents that needed to be removed. Further up the bell into the stem there were two more severe dents that had to be removed. Both were sharp and both were deep. To remove them, I used a series of dent balls on a french horn mandrel to raise the dent to surface and tap on it. After repeating this process several times, the dents were as good as gone.
Continuing down the bell stem towards the ferrule, I encountered a smashed in finger hood. This is not an uncommon dent. To remove it, we must first remove the finger hook. While already set up at the soldering bench, I soldered a dent puller into the crease of the dent. With a hefty weight on its shaft, this puller can be used to put quite a bit of force on the dent, pulling it up enough to get a dent ball in. Once it was pulled up, I used a series of dent balls strung down a cable to knock the dent out. The dent is now mostly out and will be burnished next week.
Towards the end of the week, we looked at restringing French Horn rotors. This process was actually more complicated than I expected. We began by removing all of the levers from the horn and aligning them. After reinstalling them, we string the rotor using the "Three Under" method. It is very difficult to explain, but it strings the horn in a way that allows you to adjust the height of the key with one screw, and doesn't leave any slop. The three levers were strung and leveled to each other perfectly.
Like on trumpets, the tubes on a horn get bent and knocked out of alignment. One issue that I was having was the mouthpipe receiver end was bent in at the brace. To fix this, I used a piccolo mandrel inside the mouthpipe and simply bent it back. Nothing fancy, but it's in line now.
While this is not my work, I felt it was worth showing. This video is of Doug bending a cornet mouthpipe to replace on a project horn. This pipe is filled with a tar-like substance called pitch, to stop it from crimping when bending. Take note of his hand position, his speed and the position of the pipe in the vice. It is important that the tube does not move on the jig, and that the speed is constant to avoid crimping. This was his first attempt. It did not bend as far as he would have liked, but the bend was smooth. After some minor adjusting, he fit it to the cornet well. Enjoy.


